

.svg)

.svg)

.svg)


-2.svg)


Do you wish there were more fields in WorkflowMax to capture additional data? Using Custom Fields it is possible to create, store and report on any piece of data you would like to capture against Clients, Contacts, Suppliers, Leads, Jobs, and Timesheets.
This creates a hugely powerful, configurable database allowing you to customise WorkflowMax to your needs.
Some examples of where Custom Fields would be useful:
- Recording what industry a Client belongs to
- Storing the favourite sporting team of each contact
- Knowing which clients have more than 10 employees
Using this data you can then create an email list using the Report Builder for all Clients in say the publishing industry, with more than 10 employees who support the Blues.
For leads you could add fields like expected close date and probability thus providing a level of revenue forecasting via the Report Builder. Or for jobs you could create a Project field, allowing you to report on all jobs that belonged to a single project. The options are endless.
So how does it all work? Let's look at an example and assume we are a creative agency providing a range of services to each of your clients.
Using custom fields you can 'tag' each of your clients against a list of services used and report against that. (This tip would also work for any business that supplies a range of services to their clients)
Setup
- In WorkflowMax go to Admin-Custom Fields.
- Click new custom field on the left.
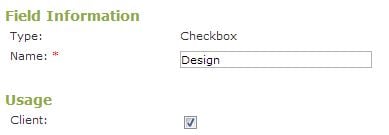
- Scroll down to the type of custom field you require, in this case it will be a Checkbox, click the checkbox select button on the right hand side.
- Once selected, name the field after the first type of service you supply to clients-

- In this case its Design, click the 'Client' tick box underneath to ensure this field shows up in the client database.
- Click save.
Great, we have now created a 'tick box custom field' against every client in WFM. Repeat the process above until you have created a complete list of services loaded that you supply to clients.
Here is an example of services-

The custom field tab areas is quite handy, as it allows you to drag and drop the custom fields into a specific order, how you want them to appear in the interface. You can also create custom header fields so that you can group a number of custom fields together.
Now you can edit your client list and tag each client for the services they use-

Reporting
Now we need to build a report that will allow you to see an overall picture of which clients are using what services.
- Go to- Reports- Report builder.
- In the report type drop down, choose Client & Contact report type.
- Click create.
- In the next screen, give your report a relevant name

- In the fields area, choose the relevant fields you would like to see on the report, keep adding fields required, including the custom fields you created earlier.
- Any custom fields created will show at the bottom of list, for each area they are created in
Now you can preview and tweak your report to give you the right information and format, make sure you save your report, when run it should look like this:

The custom fields and reporting can give you a vast amount of insight into your workflow.
